![]()
![]()
![]()
|
|
|
|
If you'd like, you can share timesheet details between the two systems. You can either import (history) from QuickBooks to BigTime, or you can post information from BigTime to QuickBooks.
|
See Also |
You can import your timesheet history from QuickBooks by using the Tools... QuickBooks Data... Import History screen.
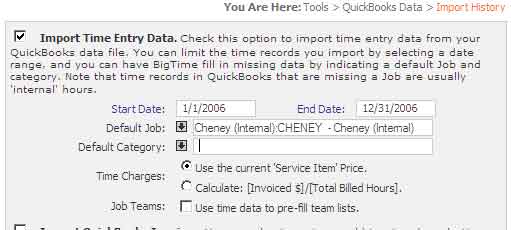
When you import timesheet data from QuickBooks, you have a couple of optional parameters.
While there are a number of things to consider as you're preparing to exchange time entry details, actually transferring data is extremely simple. Once your system is setup the way you'd like it, exporting time details is as simple as checking off the timesheets you'd like to export and clicking the "post" button.
Note that if you aren't planning on posting timesheet data to QuickBooks, then you can turn that feature off in the Tools... System Settings... Workflow screen. This will hide the Post Timesheets menu item on screen.
Before we post timesheet data to QuickBooks, we'll talk about a few of the items you need to setup in order to make sure time transfers properly.
You can only export time detail records that are linked to a valid QuickBooks job and a valid QuickBooks service item. So, if you are using a house account to track things like vacation, sick time, travel, etc. you'll need to make sure that house account has been linked to a job in your QuickBooks job list.
You'll also need to make sure that a service item is specified for each time entry. BigTime can pull service items from either the labor code the user selects or the budget item they select.
If a user enters time against both a budget item and a labor code, then BigTime assumes that the budget item's "QuickBooks link" takes precedence.
If you have no hourly employees (oryou don't use the QuickBooks payroll service), then you don't need to setup any payroll filters. If you have one or more hourly employees, however, then each of their time records will need to be attached to a specific payroll item (so your QuickBooks payroll system knows what rate to pay).
In QuickBooks, you enter a payroll item when you create your timesheet. In BigTime, the user doesn't get to determine what payroll item their time is attached to. Instead, you create a set of "rules" that apply those payroll items automatically.
If, for example, you decide that any time billed to the project "Internal:Vacation" should be linked to the payroll item "Vacation," then you setup that rule in the Monitor. You can also setup a "default" payroll item, so your payroll logic can (for example) look like this:
You create payroll filters in the BigTime Monitor. Just open up the Monitor's Import... QuickBooks... Settings page, and click on the Payroll Filters tab.
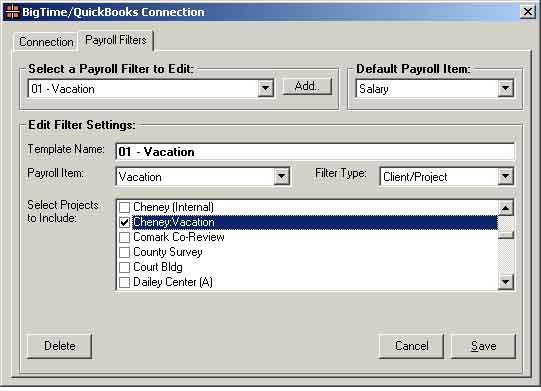
The "default" payroll item can be edited here, along with a list of filters you've defined for your system. In this sample screen, the default item is "salary." We're also editing a payroll filter that we've created.
In QuickBooks, Overtime pay is difficult to track automatically. That's because each individual time entry is linked to a single payroll item. If an employee works 45 hours and is eligible for 5 hours of overtime, you would need a separate "time record" of 5 hours for overtime data (e.g. you can't enter five separate 9 hour days and link "part" of that time to the overtime payroll item).
For this reason, most firms adjust employee payroll for overtime manually (after they've generated payroll but before the checks are cut).
If you'd like your employees to be able to indicate what hours are overtime, you could setup an "overtime" labor code. Then, setup a new payroll filter (of type "Labor Code") and include that overtime category in it. Then, each hour logged to the "overtime" code will be linked (when exported to QuickBooks) to your overtime payroll item.