![]()
![]()
![]()
|
|
|
|
Your customer list is imported as soon as you sync BigTime with QuickBooks.
As you use both systems, you'll add new customers and jobs along the way. When you do, you'll want to decide whether or not the job(s) you create should be shared. That entire process can be managed from the Tools... QuickBooks Data... Project Integration page. We'll refer to that page throughout this section.
|
See Also |
When you de-activate a job in QuickBooks, it drops off the radar screen for BigTime. That means BigTime no longer sees that job. In the Project Integration page, you'll still see the job name, but it's status will be set to "linked but inactive."
We don't delete the link to that job, however. If you re-activate that job in QuickBooks, BigTime will restore the connection without any intervention from you.
Usually, you'll set a job to inactive in BigTime long before you de-activate it in QuickBooks. That's because you stop billing time and expenses to the job first, then you stop generating invoices for it, then (after the customer has paid their last invoice), you deactivate the job in QuickBooks.
Even so, some customers like to control job status in QuickBooks instead of controlling it in BigTime. If you'd like, you can tell BigTime to automatically de-activate any BigTime jobs that are de-activated in QuickBooks. You just need to set the "Default Inactive Job Status" value (on the Tools... QuickBooks Data... Settings... General screen) to a specific (inactive) production status code in BigTime.
Once you turn that option on, the production status code will be controlled by QuickBooks. Each time a job is de-activated in QuickBooks, BigTime will change the production status to the "inactive" code you've selected.
When you add a new job to BigTime, your users can add it to QuickBooks automatically. If they decide not to do that (or if you'd rather have your QuickBooks manager review/approve jobs before posting them), then you can manually post a job using the Tools... QuickBooks Data... Project Integration screen.
For more details on how these two transfers work, take a look at the Adding Projects to QuickBooks topic.
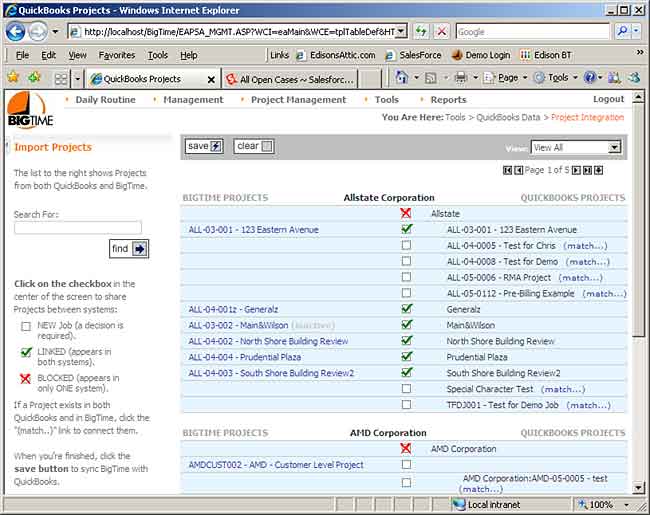
If you add new jobs to QuickBooks, then you'll need to bring them into BigTime. That's a two-step process. First, you'll need to import the new QuickBooks job into the Project Integration screen. Then, you'll have to tell BigTime that you'd like to "share" that job.
If a project has been shared, that status is indicated with a green check box. If the system has blocked project sharing (because of an error or because you've told it you don't want to share that particular project), you'll see a red x instead.
In QuickBooks, there is no such thing as a "customer" record. All of your information is arranged within the job list, and staff members can create time records, expenses entries or invoices at any level in the hierarchy you'd like. Any consolidation of that information must be done by hand (e.g. - a "consolidated" invoice can't be generated automatically in QuickBooks), and none of the job-specific information (e.g. - address info or contact names) is shared among the projects that are attached to a specific "customer" record.
In BigTime, we enforce a client:job relationship. Even firms that don't typically think in terms of projects will create at least one project for all of their accounts (e.g. - "General Consulting"). Typically, this isn't something you need to think about. However, if you aren't consistent in how you approach jobs in QuickBooks, it could create some confusion.
When you import your job list into BigTime, you need to decide what you'd like to do with the QuickBooks "customer" record (the lowest level on the QuickBooks job hierarchy). If you don't use anything but this level within QuickBooks, then the answer is easy and BigTime doesn't even bother asking. It just assumes that every "job" in the BigTime system is a new "customer" in the QuickBooks system.
If you use jobs in QuickBooks, then the issue is more complex. You'll need to decide if your staff is allowed to bill time at the customer level, or if every time entry record should be linked to a specific job. You'll also need to decided whether or not you'd like to create "consolidated" invoices for one or more of your customers. If the answer to either of these questions is yes, then you'll need to create a "master job" in BigTime. That's easy to do, you'll just tell the system to import BOTH customers AND jobs as projects.
This selection will effect how new projects (created in BigTime) are posted into your QuickBooks list. Typically, if you are using QuickBooks jobs, then you would ask BigTime to automatically create both the customer and the job record in QuickBooks for the first job that gets created under a new customer. You can also turn OFF this feature and add your own "master project" records for each new customer as appropriate.
The default field mappings between the QuickBooks job list and the BigTime project list are in the  appendix to this chapter. You can, however, change how most of those fields are mapped using the project specific options in the Advanced QuickBooks Settings.
By default, BigTime ships with a list of project/customer types which fit your industry. If you'd like, you can delete these type codes and replace them with type codes from QuickBooks. You'll check off that option in the advanced settings for QuickBooks.
Once you turn on the link between your BigTime and QuickBooks type codes, you'll be asked if you'd like to replace your BigTime codes with the ones from QuickBooks. If you don't, then you'll need to connect those type codes by editing them in the OPERATIONS...SYSTEM SETTINGS...LISTS/LOOKUPS...FIELD VALUES page (you'll see a place to specify a code link under both Customer Type and Project Type fields).