![]()
![]()
![]()
|
|
|
|
If the project you're looking for doesn't exist in the Project List, then you can add it to the system by following these instructions. Note that projects that already exist in QuickBooks are pulled into the system automatically.
If it doesn't exist yet, then add your client at the bottom of the screen. You don't need to fill in a lot of data for new clients. In fact, only the client's name and ID are required. The ID field needs to be unique (and it's typically a "ticker symbol" style abbreviation of the client's name).
The system will automatically forward you to the "Add Project" screen. While you can fill in lots of information on this screen, the only required fields are the project's name and ID. Note that the ID will simply say "auto" if you have BigTime's auto-numbering feature turned on.
Once you've added a new project to the system, the project's dashboard pops up automatically, so that you can enter in more detailed information (e.g. - teams, budgets, notes, cost center codes, invoicing or billing rate information, etc.), but none of that information is required. Users can start logging time and expenses against your new project right away.
|
See Also |
Every project you add to BigTime has a client record associated with it. Even if you are in an industry that doesn't typically use projects (e.g. - Public Relations or Accounting), we create both a client and a project record for every account team in the system.
BigTime does not, however, create a separate "client list" for you to edit and review. The client's information is simply packaged together with each of the project dashboards in the system, so you don't need to maintain both a client list and a project list.
Every project that is added to the BigTime system must have a unique project "code" (in addition to the project's name). Many customers prefer to create their own code number, but BigTime can be setup to create that code automatically.
To setup or edit the project auto-numbering settings in BigTime, just open up the Tools...System Settings...General Settings page. There's a section on auto-numbering where you can setup both the format and the "next ID number" for your system. BigTime can use a universal counter for the entire company (e.g. - the first project that is added to the system is project "1", the second is project "2", etc.), or it can use a client-specific counter (the first project for each client is called project "1").
The project auto-numbering system can also incorporate other data into the project ID. You can setup the system so that, for example, a new project added to the client Allstate (whose code is "ALL") on 1/1/06 is called "ALL-06-001." The formats are fairly self-explanatory, but there is a section on project auto-numbering which outlines how to setup this feature in more detail.
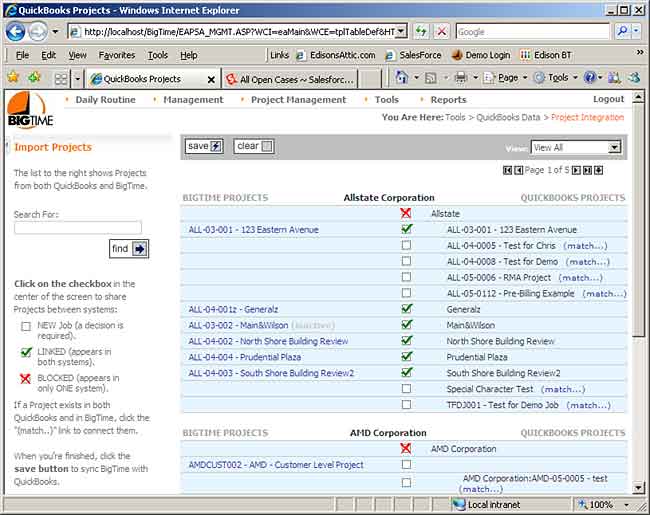
If you are a QuickBooks user, any new projects that you add to BigTime will be transferred to your QuickBooks project list automatically. You just need to make sure that the "transfer project to QuickBooks" checkbox (at the bottom of the Add Project screen) is turned on. Those additions don't need to wait for the nightly sync to complete. They're processed right away.

Occasionally, you'll want to transfer an existing project into QuickBooks manually. Maybe you forgot to check off the Add Project to QB checkbox, or maybe you would prefer the QuickBooks administrator to do all of the data transfer manually to maintain control. Whatever your motivation, moving projects between the two systems is simple. Just follow these steps.
For many project-based firms, the estimates, tasks, billing rates and even project teams are very similar for different projects of the same "type." You may, for example, have the same set of a dozen phases for any new project you add to the system. Similarly, you may want to copy the billing rates from your initial project for a specific customer to any additional projects you create for that customer.
While other systems require you to setup project templates, BigTime lets you accomplish this task directly: by allowing you to copy different parts of the project dashboard from one project to another. This lets you use real-world projects as your template (instead of relying on you to go back and update your templates with the "newest" revisions).
Within the project dashboard, you'll see "copy from" links or buttons on the custom fields page, the team list page, the billing rates page as well as the estimate and task pages. Clicking on any of those buttons will pop up a 'project selection' dialog box that will let you choose the project you'd like to copy data from.
BigTime will automatically overwrite the current project's data with data from your "copy from" project. Only the type of data you've copied will be overwritten.
This same type of "copy from" functionality exists for new projects you add to the system. So, you can copy data from other projects right from the new project screen.
You aren't precluded from creating your own set of project templates in the system. Just create a new project for each template "type" and add teams, billing rates, task or estimates, notes, etc. Then, when you create a new project of this type, use the "copy from" buttons to copy data from those template projects just like you'd copy them from any other project. It might make sense to add a "template" project type (so that those projects are grouped together in your system and you don't lose track of them).