![]()
![]()
![]()
|
|
|
|
If you'd like BigTime to create an auto-number format for all of the new projects you create in the system, you can use the auto-number setup at the top of the System Settings...General page. That field will let you specify project number formats that combine the client's ID with year/month information as well as an auto-incrementing value (e.g. - "ALL-06-001" is the first project in 2006 for the client who's ID is "ALL").
While we'll review auto-numbering for projects here, these same settings can also be used to automatically number your invoices as well.
|
See Also |
You'll enter your auto-number format in the field provided. Since each auto-number can take advantage of an incrementing number, you can enter in the "next" value for that incrementing number as well. The simplest format for auto-number would just be a numbering system that starts at 1 and goes on up for each new project: 2, 3, 200, 1001, etc.
Many firms, however, have a more complicated numbering scheme. Listed below are a few examples (as well as their format) based on a fictional sample project. Note that these examples assume that the "next id" value is 101.
Project Name |
123 Electric Avenue |
Client Name |
Allstate Corporation |
Client ID |
ALL |
Project Start Date |
1/1/2005 |
Project Type |
General Consulting |
PPP |
101 |
PPPP |
0101 |
CCC-YY-MM-PPPP |
ALL-05-01-0101 |
YYYY-CCCCC-PPPPP |
2005-ALL-00101 |
CCC-TT-PPPP |
ALL-GE-0101 |
Your options for creating a project id using the auto-format feature are updated regularly, so take a look online for a complete listing of auto-format options.
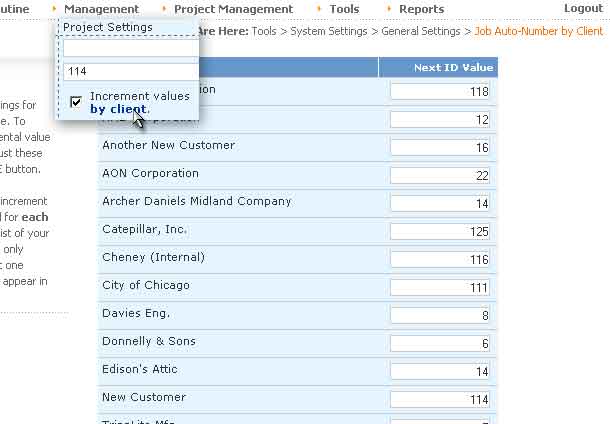
The auto-number's "next-id" value is typically universal. One client might use the value 101, and another might use 102, etc. If you'd prefer to keep track of a unique incrementing number for each CLIENT in the system, you can do so by checking off the "increment values by client" check box in the auto-format section. That will create a unique counter for each client in your system (starting at 1).
If this option is turned on, you can still edit the "next id" value on a client-by-client basis. Note that the "by client" text in the check-box label is a hyperlink. Click on it to review a complete list of client-specific "next id" values.