![]()
![]()
![]()
|
|
|
|
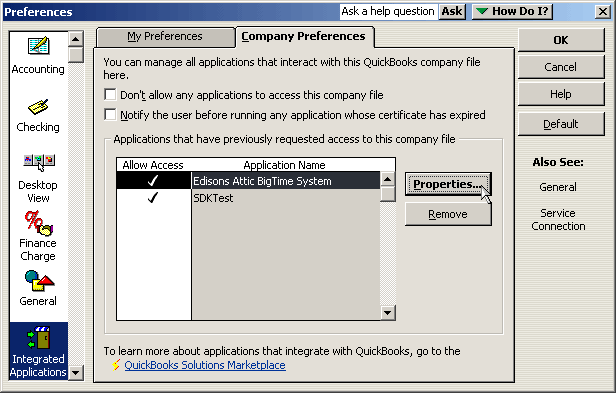
The standard installation will prepare BigTime to share information with QuickBooks on the server. If, for some reason, you need to delete and re-create your connection to QuickBooks (of if you neglected to setup BigTime to login in "un-attended mode" during your initial installation), you'll need to adjust BigTime's rights from within QuickBooks. This section will introduce you to some QuickBooks login basics and help you understand how to adjust login settings from within QuickBooks.
|
See Also |
Whether you've already installed BigTime (and are now getting connection errors) or you are just starting out (and would like to design your link optimally), you can follow these three steps.
If BigTime is installed on a server (or on a PC that other QuickBooks users will not use), then you should setup a new user that BigTime can login as. Give that user access to the entire QuickBooks data set (just like an administrator). You can create/edit user logins from the "Company...Set Up Users" menu item in QuickBooks.
If you have installed BigTime onto a PC that is currently used by another QuickBooks user, then BigTime should login to your QuickBooks data file as that user. This will minimize login conflicts.
You can minimize login conflicts by making sure that your BigTime sync is scheduled at a time of day when other activity is minimized. You can do that using the Scheduled Transactions branch of the BigTime Monitor. Most customers schedule that transaction to take place each night. You should also remember to schedule it at a time that won't conflict with your regular backups. Obviously, BigTime won't be able to open your QuickBooks data file if a backup job has it locked!
Make sure that nobody keeps the QuickBooks file opened in Single User Mode. Having the file opened in Single User Mode will prevent other users (including BigTime) from getting into the file. Also, remember that you have to SWITCH BACK to multi-user mode (it doesn't default to multi-user mode when you exit QuickBooks).
If you install QuickBooks onto another machine in order to sync with BigTime, then make sure that the new copy of QuickBooks is registered and activated. If it's not, then QuickBooks will not allow integrated applications (like BigTime) to access your company data file.
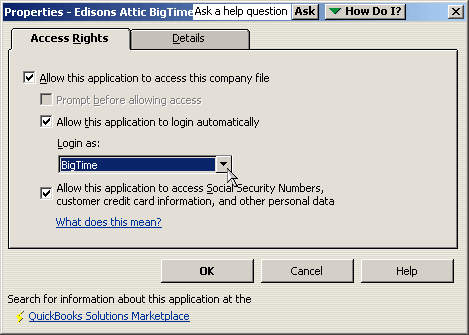
When BigTime connects to QuickBooks, it connects just like you do: by logging in to the company data file. In fact, you tell the QuickBooks file what "user name" BigTime should use when it logs into your file as a part of the connection setup.
QuickBooks has a more limited login policy than BigTime (or even typical database programs). While these limitations probably won't be visible to one or two accountants or company owners, once you connect your QuickBooks file to BigTime (with regular updates and postings), those limitations may create problems.
To avoid problems, it's important to understand the limitations that QuickBooks imposes on multi-user installations:
QuickBooks Rule #1. QuickBooks will only allow one user login per machine at any given time.
QuickBooks Rule #2. If a user logs into QuickBooks in "single user mode," then no other user will be able to login until that user is finished. You must be logged in using "multi-user" mode in order for other users (including BigTime) to gain access to QuickBooks.
QuickBooks Rule #3. QuickBooks will not allow the same user login to be used at the same time from two different machines.
QuickBooks Rule #4. You cannot have two "instances" of QuickBooks open on a single machine and QuickBooks can only review one company data file at a time.
QuickBooks Rule #5. Every computer that connects to QuickBooks must have the same set of QuickBooks program updates applied. If you apply an update to one system, you MUST apply it to every other computer that accesses that company data file.
Those five simple rules will dictate how you setup BigTime in your environment.
By default, an integrated application (like BigTime) assumes that QuickBooks will be opened/logged in when it attempts to connect. If it's not, your QuickBooks administrator can either (a) refuse to let BigTime connect or (b) permit BigTime to connect using a specific user login. You make that selection inside of QuickBooks.
Having a clear understanding of the limits QuickBooks places on multi-user logins makes it much easier to setup your BigTime link in a way that fits with your environment. Consider the following examples.
ABC Company has installed BigTime on their accountant's desktop. When the system asked them what user login to allow BigTime to use, they selected the "admin" user account.
The accountant has her own login ("HSmith") to QuickBooks. This setup will create problems if both BigTime and the accountant need to login at the same time. That's because this setup violates RULE #1 (only one user login per machine). If BigTime logs into QuickBooks behind-the-scenes as "Admin," the the accountant won't be able to access the company data file as "HSmith" until BigTime lets go of it's connection.
In this example, it would be better to setup BigTime to login as "HSmith." Then, both BigTime and the accountant use the same login. That's appropriate because they are also using the same computer!
ABC Company has BigTime installed on the corporate server. When they installed BigTime, they told the system to use the QuickBooks login "admin."
In this scenario, the accountant and BigTime can both login to QuickBooks at the same time. That's because the accountant is using one machine (her PC), and BigTime is using another (the server).
If, however, the accountant tried to login to QuickBooks as "admin," QuickBooks wouldn't let her. That's because QuickBooks won't let the user "admin" login from two different workstations at the same time. If both the accountant and BigTime are supposed to use the "admin" login, then only one system could login to QuickBooks at a time.
Monitor is a program that runs on your BigTime server, and you leave it running all the time.
In addition to the other tasks that Monitor runs, it has--built into the connection with QuickBooks, a set of scheduled "todo" tasks that we refer to as the "nightly sync".
The nightly sync is run every night, and it's used to examine your QuickBooks file for changes that may effect BigTime. It pulls in new projects, new staff members, updates to your chart-of-accounts or item lists, A/R updates and more.
Since it's doing a lot of digging in your QuickBooks file, the nightly sync can take several minutes to complete. Because of that, the sync is typically scheduled to run at night (when other users aren't in QuickBooks) to minimize disruptions. That's why we call it the "nightly sync."
As a part of that transaction, we pull project list updates, adds to your staff and vendor list, updates to your A/R and vendor expenses, and any adjustments to your chart of accounts and your item lists.
You can change the scheduled time(s) that the nightly sync runs by adjusting the Project/Staff integration transactions in your Monitor's Scheduled Transactions list. You can also kick off a "manual sync" to force the system to pull data out of QuickBooks right away.
Everything that the nightly sync pulls into the system can be pulled in manually from the Tools... QuickBooks Data... Manual Imports screen.
Let's assume, for example, that you are creating invoices for your customers in BigTime, and you realize that there are several vendor expenses missing. You can hunt down those expenses and add them (as bills or checks) to your QuickBooks data file. You won't, however, want to wait for the nightly sync to "spot" those new expenses and import them. You'll want to grab them right away so that you can add them to your BigTime invoices.
You can manually kick off an "import" of missing expenses using the Tools... QuickBooks Data... Manual Imports screen. Just check off the "expenses" option and click GO. BigTime will ask Monitor to login to QuickBooks and retrieve the information you're looking for.
BigTime ships out of the box with certain integration options enabled, but you can change those options from within BigTime. All of BigTime's settings are controlled from the Tools... QuickBooks Data sub-menu. There is a menu called Settings... General within that area of the system, and it pops up a page of integration settings (grouped by transaction type) that you can review and edit.
At the top of that form, you can set the version of QuickBooks your system is connected to, the "master project" settings (e.g. - how your system will deal with customers and jobs), your default AR account (to which invoice data will post) and more.
Note that the settings you see on screen are based on the version of QuickBooks you're using. Update your QuickBooks version, and some of the optional settings will change (e.g. - you won't have an option to email invoices if you aren't using QuickBooks 2007 or higher). So, if you need to update your QuickBooks version, you should do that first. Then, save your change so that the rest of the options on screen reflect options that version supports.
In addition to these basic options, the QuickBooks settings page contains a long list of integration settings that let you adjust how project, staff, invoice, timesheet and expense data is shared between the two systems. These options are turned on/off depending on the version of QuickBooks you are connecting with, so some of the optional settings may be missing if you are using an older version of QuickBooks.
We'll cover many of these options when we talk about each of the transactions that BigTime supports. Whenever the System Guide talks about adjusting a QuickBooks Advanced Option, it's referring to this "settings" screen.
Some BigTime customers would prefer not to install BigTime and QuickBooks on the same computer. For these customers, BigTime has created an add-on product called the Remote Monitor which can be downloaded and installed from the BigTime website.
BigTime typically creates a conduit, running behind the scenes, between your BigTime server and QuickBooks. By installing and configuring the Remote Monitor onto a specific user's desktop, you're moving that conduit off of the server and putting it onto a user's desktop instead. Once you do, all of the conversations and data transfers between BigTime and QuickBooks will happen at that user's desktop (instead of on the BigTime server).
Take a look at the Installation section for information on installing Remote Monitor.
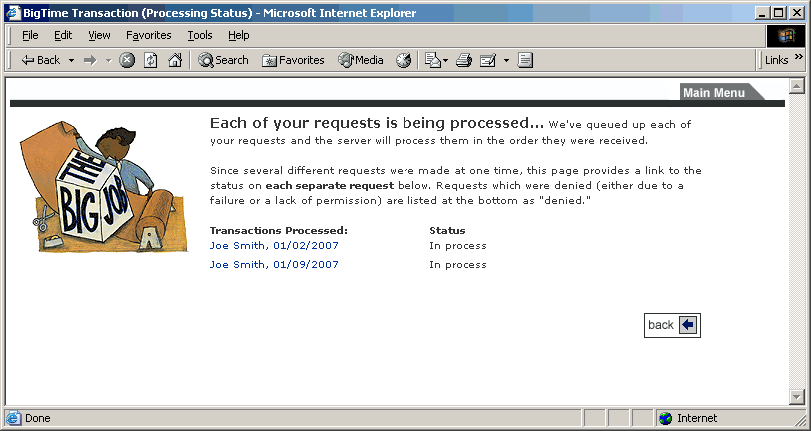
Typically, requests for QuickBooks data are handled behind the scenes (on the BigTime server). When you post a timesheet, for example, you get a transaction processing screen that says "in process." Once the timesheet is posted, the system lets you know that the transaction as "completed successfully."
Once you install Remote Monitor onto a user's PC, all of your connections to QuickBooks will be forwarded to the that user's PC for processing. Their PC becomes your "conduit" between BigTime and QuickBooks.
Consider a typical timesheet posting transaction in BigTime. In order to post a timesheet, you would goto the Tools... QuickBooks Data... Post Timesheets screen. Then, you would check off the timesheets you'd like to post to QuickBooks and click GO.
Once you click GO to post timesheets, a request to push data from BigTime to QuickBooks is created. You see the status of that request in the "transaction processing" screen. The "transaction processing" screen lets you know that the system has queued up your request and is waiting for them to complete.
If BigTime were connecting to QuickBooks on your server, then it would simply login to QuickBooks and post the information you've asked it to post. Since we're using Remote Monitor, however, the server simply forwards your request to the Remote Monitor on your user's PC.
On you web-page, you'll see the status change from "in process" to "Completed (Forwarded to QuickBooks)" in the Browser window.
Meanwhile, in the Remote Monitor, you can click the REFRESH button in order to see these transactions appear in the "to be processed" list.
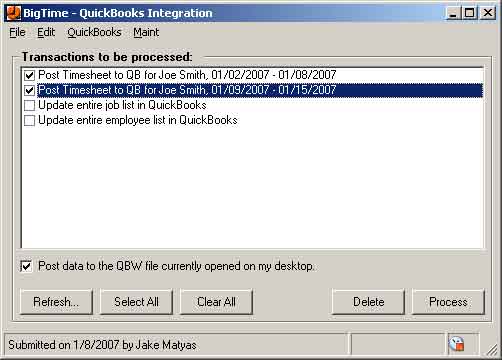
To post this time to the QuickBooks file we have opened on our desktop, we just need to check the transaction off and click the PROCESS button on the Remote Monitor. The system will post both timesheets to our QuickBooks file, and they'll disappear from the list of "transactions to be processed."
Meanwhile, back in the browser window, the status of each transaction will be changed from "forwarded" to "completed successfully" (or to "failed" with a link to the specific causes), so you know that a transaction has been processed.
As you can see from this example, the Remote Monitor gives the end user ultimate control over what data gets posted to/from QuickBooks. If the Remote Monitor user decides not to post the timesheet transactions per my request, they can simply delete the transaction from their list. Similarly, if they're busy doing something else and just want to queue up the transaction(s) for later, they can ignore them until they're ready to process.
If you'd like to setup the Remote Monitor to process transactions automatically, you can. Just setup the Automatic Update settings (under the Edit...Automatic Updates menu) to download and process transaction request every so many seconds.
Keep in mind that the QuickBooks file will need to be accessible or the transaction will fail!