Editing Invoices
Once your invoice drafts have been created, you can edit any invoice in the system by popping up its "detail" screen from one of three places:
- The project dashboard's Budget/Hours... Invoice History screen,
- the Management... Review Invoices screen or
- the Tools... Invoices, Print/Post Finals screen.
No matter where you find the invoice you are looking to edit, when you click on it, you'll pop up a screen that looks similar to the one shown here.
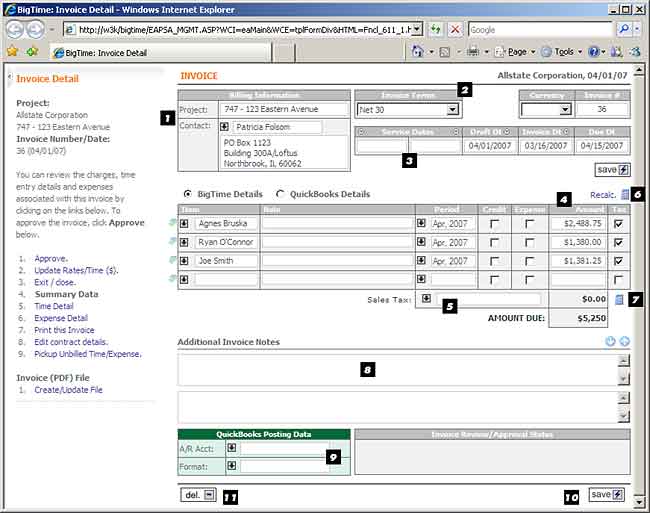
- The project/contact to which the invoice is linked is shown in the upper left corner of the edit screen.
- Invoice Terms. You can adjust the invoice "terms" from the pick list at the top of the page, and the invoice due date will be updated automatically. Note that the list of terms that you see here is pulled from QuickBooks automatically, but you can edit that list in the Tools... System Settings... Invoice Terms screen.
Currency. If you have the multi-currency features in BigTime turned on, then you can specify a currency for this invoice as well.
Invoice Number. The invoice "number" is in the upper right-hand corner of the screen. The invoice number may be blank, and you have a couple of options for filling it in:
1. You can fill the value in by hand on this screen. If you do, that's the invoice number that will post to QuickBooks.
2. You can auto-assign the invoice number based on your own numbering rules. The system will create a new invoice number each time you generate a new draft invoice (so this field will be filled in for you).
3. You can leave this field blank and ask BigTime to wait and pull an invoice number from QuickBooks. If the field is left blank, BigTime will ask QuickBooks to fill it in (when you post the invoice) and will copy the QuickBooks invoice number into that field.
- Service Dates and Invoice Dates. Each invoice can have a set of service dates, a "draft" date (that tells BigTime what period revenues should be linked to), an "invoice date" (which is the date the invoice went out, and the date we post as the "invoice date" to QuickBooks), and a "due date" (calculated automatically from the invoice date and the terms).
- Line Items. Invoices are made up of "line items," and you can edit the line items that appear on your invoice in the middle of the screen.
- Item Name. Enter a line item name in the "item" field. If you are sub-totalling the invoice data, then you can pick the "item name" from a list (based on your sub-total settings for the project).
- Notes. The Notes field supports up to 1000 characters of notes for each line item, and the text will wrap/expand automatically as you type.
- Period. Each line item can be linked to a specific period in BigTime, which tells the system what financial period to place the revenues into (for reporting). Leave this field blank to default to the invoice's period.
- Credit. A "Credit" line item is the same as a "reduction" (or a negative number in the amount field). Use the credit check box whenever possible (instead of filling in a negative number in the amount field), so BigTime knows you're entering a write-down.
- Expenses. This flag let's BigTime know that the line item is an expense-based charge (and not a fee-based charge). Items that are not part of your professional fees (e.g. - pass through expenses or service charges) should be marked as expense items.
- QuickBooks Item. If you select the "QuickBooks Data" radio button at the top of the list, you'll be able to assign each line item to a specific QuickBooks item. Your system will use that item when it posts this invoice to QuickBooks.
- Taxable. For US versions of BigTime, items can be marked "taxable" or "non-taxable." For Canadian, UK and Australian versions, each line item on the invoice can be assigned a separate taxable rate.
- Drop-Down Menu Icon. At the start of every line is a drop down menu icon that you can click to insert new line item(s), delete the line or re-calculate it (based on the invoice's formula).
- Sales Tax. US Versions of BigTime allow you to select an overall sales tax rate for the invoice. The list of tax rates is pulled from your QuickBooks tax item list.
- Re-Calculate Icon. Line items are computed automatically when you create an invoice. You can re-calculate your invoice line items at any time by hitting the RECALC button at the top of your charges list. BigTime will replace your line item list with a newly calculated set of items. You'll need to click this button if you update your time/expense details and you need to have those updates reflected in the invoice's "amount due."
- Sales Tax Calculator. You can re-calculate the sales tax due as well by clicking the calculator icon next to the sales tax field. The system will also automatically recalculate sales taxes when you SAVE changes to the taxable status of any of your line item or to the invoice's tax rate.
- Invoice Notes. There are two invoice notes fields for every invoice. Each one can contain up to 1000 characters of "general notes" for the invoice, and they are pre-filled with data from the project dashboard, so they're an excellent spot to store things like client-specific po data, etc.
- QuickBooks Settings. When you post an invoice to QuickBooks, you can adjust the format BigTime uses, and you can also choose a specific A/R account the item should post into.
- SAVE any changes you make by clicking the save button at the bottom of the page.
- DELETE this invoice by clicking the DELETE button at the bottom of the page.
Editing Invoice Line Items

Every invoice is made up of line items, and those items are typically calculated automatically by BigTime. There is no reason, however, why you couldn't create a "blank" invoice and add your own line items as required. That's what you do in QuickBooks, each time you create a new invoice.
You can add new invoice line items by entering them into the first "blank" row at the bottom of the charges section. Just enter in your new line item, and the system will add a new blank row for you to enter another line item.
Inserting Line Items
If you'd like to insert a new line item in the middle of your invoice, then click the MENU icon at the left of the line you'd like to insert above. When you do, you'll be able to select the Insert Line menu item and a new blank line will appear in your invoice. PC users can also use the INSERT key to accomplish the same task.
Deleting Line Items
To delete a line item, use the same MENU icon at the left-hand side of the row you'd like to delete. Click it to drop down a line item menu, and then select the Delete Line menu item.
Re-Calculating Line Items
The final select in the line-item drop down menu is used to Recalculate a specific line item's Amount. The system will use the basic invoice formula to re-calculate the specific line you've selected, but your notes (and any other changes you've made to the line item) will be saved. That's different than re-calculating an entire invoice, since the latter will remove/replace all of the invoice's line items.