The final step in the invoicing cycle is the production of an "invoice document" that can be sent to your client. Traditionally, that document is just a printed report that can be mailed to your customer. Today, however, most of our customers prefer to create PDF documents that can be emailed (either via BigTime or manually) to their customers for payment.
Invoice Documents are reports in BigTime. We'll walk you through how to print up any of the invoices in your system using any of the printed formats we support in this section of the System Guide. Then, we'll talk about how to use those reports to store a PDF for each invoice right alongside the invoice itself. That PDF document provides an electronic copy of the invoice(s) you print out, and it can also be used to email invoices directly from BigTime.
|
See Also |
You can print a single invoice for any project in the system, or you can select a batch of invoices and print all of them at the same time.
Most of the invoice formats that BigTime produces include your company's information in the invoice header. You can edit the address and logo information that appear on those documents by browsing to the Tools... System Settings... Report Settings screen.
The typical invoice header has a 1.25" square where your company logo is placed, and the file you upload will be "zoomed" to fit that physical dimension. It will be aligned in the upper right hand portion of that logo space, so both vertical and horizontal logos will fit properly on the page.
BigTime will accept bitmap, GIF and JPEG files for your logo, and larger files will be printed with more detail on the final output.
Keep in mind that you can tell the system to include your logo ONLY, your firm's address ONLY, or nothing in the space where logo and address are typically placed. That latter option is useful for firms that are printing out invoices on company letterhead.
Each invoice format in the system will pull a standard invoice "footer" from your Report Settings page as well. That footer can contain up to 3 lines of text, and is automatically centered (typically on every page of the invoice) at the bottom of the page.
Most firms use this space to enter things like "remit to" information, wire transfer instructions, tax ID information, etc.
In addition to adjusting an invoice's header/footer, you can also control several additional print settings from the Tools... System Settings... Report Settings page.
All of BigTime's reports (including the invoices we create) are based on Microsoft Access reports, so you can adjust them if you have Microsoft Access (2003 or higher) installed on your PC.
There's an entire section dedicated to creating/editing reports in BigTime, so you should take a look at that section for more information. It's fairly simple, however, and requires just a couple of steps:
Once you do, you'll see a copy of that invoice (with the word "(custom)" at the end of it) which you can now use when you print invoices.
When you print out a copy of your invoice, BigTime produces an invoice document, sends it to your browser, and then discards it. You can do whatever you'd like with that document (save it, send it to your printer, or just discard it), but BigTime doesn't keep a copy.
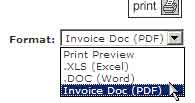
To create a permanent copy of that invoice document, you'll have to create a PDF that is attached to the invoice. We call that PDF an "invoice PDF," and creating one is just like printing a copy of an invoice.

BigTime will close the print invoices screen, and it will queue up your requests. The Monitor will automatically generate a PDF for the invoice(s) you've selected and then attach it to the invoice record. When it's finished, each invoice will have a PDF icon next to it in all of your invoice lists.

Just click on that icon to pop up a copy of the Invoice PDF you've created.
You can update the PDF that's linked to your invoice at any time by repeating these steps. A history of the documents that have been created for each invoice is stored right along with the most recent copy, so you can click on the invoice's document history to see older versions of the invoice PDF(s) you create.
You need an Invoice PDF if you are planning to email your invoices, but it's also a good idea to have a copy of the printed document you've sent to your customer.
In addition, many firms create PDFs of their draft invoices so that managers can look at them while they are reviewing invoices. That gives the manager a "hard copy" report that will look just like the report(s) sent to the client. Then, when you create the final PDF, you'll have a history built right into the documents stored on your invoice: one snapshot of the invoice prior to review/editing, and one "final" copy that was sent to your customer.