![]()
![]()
![]()
|
|
|
|
Once you've finished editing your custom report file, you can publish it back to your BigTime server using the Reports... Manage Custom Reports screen.
The system will upload your report file, and it will automatically notify the Monitor that there is a new custom report file to be published. You'll see the status of your report change from "Uploaded" to "Active" once the custom report file has been successfully published.
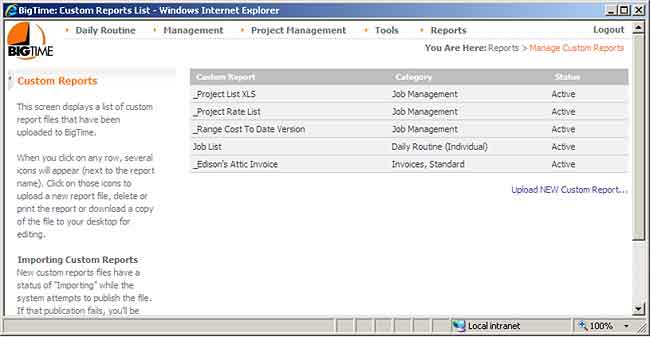
Custom reports appear in the Reports...All Reports list, right alongside the standard reports in the system. Each custom report has "(custom)" appended to it's name in the list, but printing them works just like the standard reports.
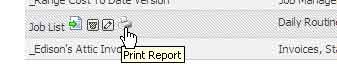
Print Custom Reports Quickly. You can also highlight a specific custom report from the Reports... Manage Custom Reports screen (above) and click the PRINTER icon on that line as a quick way to jump right to the Print Report screen for that report.
|
See Also |
Most of the standard reports ship with a "hard coded" set of fields that they support. While it's easy to add one of the existing standard fields to a report template file, editing the data that the report is based on is more involved. This section of the manual will walk through these database edits, and we'll help you understand how the reports in BigTime pull data from the database.
We assume, in the sections that follow, that you are familiar with SQL and SQL syntax (the language we use to pull data from the BigTime database). We're also assuming that you've had a chance to work with standard "custom reporting" before you start to edit datasets.
We'll walk you through the step-by-step you use to combine a customized "data set" with a customized report in the sections that follow.
When a custom report is published, the BigTime reporting engine deals with the report object and the dataset separately. We don't store the dataset in the report's "datasource" properties, because the data sources can be edited dynamically by the user (e.g. - the user could choose their own project, their own date range, etc.).
As a general rule, you'll follow these steps to create a custom data source for a BigTime report:
|
|
|
|
|
Typically, if you are planning on editing a custom report's data source, then you'll need ODBC access to the BigTime database.
If you're editing your report on the BigTime server, then there is already an ODBC datasource (called BigTime) that has been pre-installed. If you're editing reports on another PC, then you need an ODBC connection to the BigTime database.
BigTime uses a Microsoft SQL Server (2000/2005) database to house your information (even the desktop edition uses a desktop SQL Server system), so you can use the SQLServer ODBC driver that ships with your computer to access BigTime.
By default, you can create a new ODBC connection to BigTime using the following settings (note that your system may be slightly different, so you should check with your system administrator to verify these settings).
Property |
Value |
Driver |
SQL Server |
DSN Name |
BIGTIME |
Server |
[ServerName]\BIGTIME |
Login Mode |
SQL Server authentication |
Login ID |
sa |
Password |
BIGTIME |
Default Database |
BIGTIME |
Every BigTime report is based on a query. When you run a report in BigTime, the report engine will lookup the query on which that report is based. BigTime will merge that query with the user's reporting request (e.g. - adding the user's date range selection, for example). Then, the final version of the report's data source will be placed in a special view ("qryReportData"), so that your report can be run.
For this reason, every template file that you create will link your custom report to the datasource "qryReportData." You can think of that datasource as a placeholder that gets replaced when your report is published.
When you create a custom report template file, BigTime loads sample data into a table called qryReportData and then connects your report object to that table. When you edit the data set on which a custom report is based, you are editing the SQL that will eventually replace "qryReportData" as your report's source.
The very first step in this process is the creation of SQL that can be used to pull your report's data. You can start with any of the sample SQL scripts in the table below, and the Table Documentation is an excellent resource for figuring out what table(s) house the data you're attempting to report on.
Data Source |
Description |
SELECT * FROM qryTime |
Pulls all of the time entry details in the system. Note that this query will pull only "submitted" time.
|
SELECT * FROM qryTime_New |
Pulls un-submitted time entry details.
|
SELECT * FROM qryTime_ALL |
This query combines submitted and un-submitted time into a single query, but it's field set is more limited.
|
SELECT * FROM qryTime WHERE ProjectSID=<#VAR=PRJ_SID;0>
|
Pulls all time entry (submitted) data for a specific (user-selected) project.
|
SELECT * FROM qryTime WHERE ProjectSID=<#VAR=PRJ_SID;0> AND Dt BETWEEN '<#VAR=DT_BEGIN>' AND '<#VAR=DT_END>'
|
Pulls time entry data for a specific project and a specific date range. |
SELECT * FROM qryProjectList_A |
Pulls a list of all projects in the system, note that you can filter on the IsInactive field to pull only Active projects.
|
SELECT * FROM qryProjectList_A WHERE IsInactive=0
|
Pulls a list of all ACTIVE projects in the system.
|
SELECT * FROM qryStaffList_A |
Pulls a list of all staff members in the system (qryStaffList_A has an IsInactive field as well).
|
When your custom report is published, the reporting engine will automatically merge the user's reporting "parameters" into your SQL each time the user prints out a report.
Assume, for example, that you've created a stored procedure to pull a summary of time and expense data, project by project, from the system. Your SQL may look something like this:
SP_CUSTOM_ProjectData @StartDate, @EndData, @UserID
When the system calls your stored procedure, you'd like it to plug the user specified start date and end date into the first two parameters. Then, you'd like the reporting engine to plug your user's ID into the final parameter. If a specific user asks for a list of their project's data for 1Q2007, then your SQL call should look like this:
SP_CUSTOM_ProjectData '2007-01-01', '2007-03-31', 12
The user-specified parameters (in this case, a start date, an end date, and a user ID) are called Dataset Parameters. In BigTime, you use the custom report's REPORT DATA page to do two things:
To edit a report's dataset, click the REPORT DATA button on your custom report's main page. You'll be asked to login to the system using an ODBC connection to your BigTime database, and then you'll see a screen that looks similar to the one shown here.
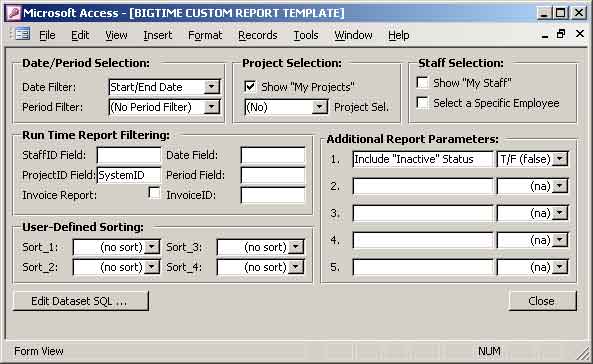
On this screen, you can select the specific options you'd like the user to be able to fill in when they print your report. You can ask them, for example, to fill in a date range (or just a "start date"), you can specify project or staff selection filters, up to four sorting and sub-sorting options, up to 5 true/false parameters, etc.
For the example listed at the top of this section (a summary of time and expense data, project by project, for a specified date range), we'd setup the report parameters screen with just the "date filter" set to "Start/End Date."
Once you determine what user parameters your report will support, click the EDIT DATASET SQL to change the SQL for your custom dataset.
Recall that our example SQL has the following syntax:
SP_CUSTOM_ProjectData @StartDate, @EndData, @UserID
Using the parameter list as a reference, we'd replace this SQL with the following tags:
SP_CUSTOM_ProjectData <#VAR=DT_BEGIN>, <#VAR=DT_END>, <#UID=XX>
This finished SQL statement contains three variables: DT_BEGIN, DT_END and UID. Note that the system requires us to specify those variables with a specific syntax (listed above), so we've included <#VAR= before the variable and > after each variable name.
When the report is run, BigTime will merge the user's ID into the UID variable, and the start/end dates the user selected into the DT_BEGIN and DT_END variables. The result is a query that SQL Server can use to return data to the report:
SP_CUSTOM_ProjectData '2007-01-01', '2007-03-31', 12
Once you've adjusted the custom SQL for your report, you can click the RECREATE SAMPLE DATA button to re-create the sample data table(s) that are stored in your template file. Then, you can go back to the main form to edit your custom report.