![]()
![]()
![]()
|
|
|
|
Your staff can print out reports from the system by selecting one of the screens in the Reports main menu.
There are two types of menu items in the Reports menu.
We cover creating and using memorized report groups elsewhere, but they're a great way for you to zero in on a set of specific reports that are useful for your company. This keeps your managers focused on a much smaller set of reports and gets everyone on the same page when you're reviewing the data BigTime helps you to collect.
|
See Also |
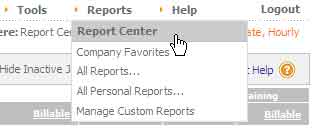
From the main BigTime menu, select the Reports...Report Center menu item. This option will take you to the BigTime Report Center window, a screen that shows all of the reports in the system (or, all the reports that you have permission to see) organized by category. Your Report Center screen will look similar to the one shown here.
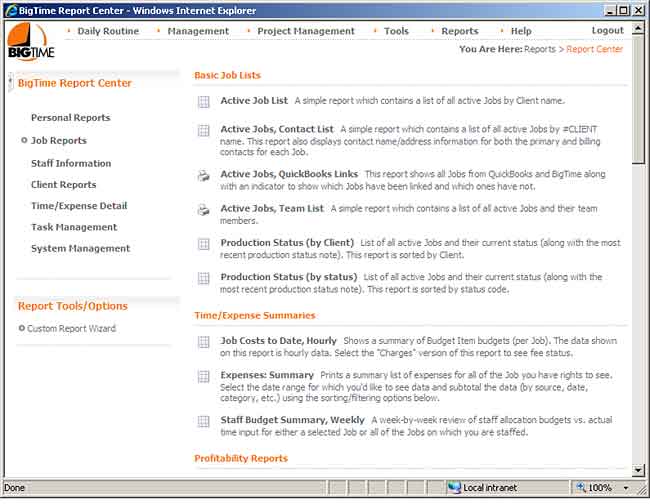
You can choose a category of reports by selecting one of the options in the BigTime Report Center box (on the left-hand side of the screen). Reports are categorized by type, and any custom reports you've created appear at the top of the screen.
To print a specific report, just click on it and the system will pop it up.
Each report in the Report Center window is displayed with an icon that tells you whether the report is a PDF report or a Tabular report.
Each report in the system has its own settings. If you're printing a PDF report, then the system will ask you to fill in the report settings as soon as you click on the report to print it. Once you do, you'll click the PRINT button to generate your report.
Tabular reports behave a little differently. First, they save your "last settings" each time you run the report, so you don't have to fill anything in before the system produces the report. To change the settings for a tabular report, just click the expansion button on the toolbar at the top of the page.

Note that some reports don't have any settings/options, so simple reports might be missing that expansion button! If the report you're workign with supports adjustable settings, then you can fill in the options you'd like to use and then click the REFRESH button to adjust the report.
Keep in mind that the settings in this area are simply "basic" report settings. Tabular Reports can be adjusted using BigTime's built-in Reporting Wizard. There, you can add/remove columns, change the sorting order, adjust the grouping(s) on each report, create specialized filters that limit the data returned and more. Take a look at that section of the Reporting chapter for details on how to adjust these reports if you need to.
Most of the sorting/filtering options are self-explanatory, but there are a couple of things to note as you explore various reports in the system.
If the report you have selected supports date range filtering, then your users can select one of the standard date ranges from the "date" drop down (e.g. - "this week", "last week", "this month", etc.).
If you'd like to manually enter a specific date range, then choose the "specific Dates" option and enter your report's start/end dates manually.
![]()
Also note that some reports allow you to enter a starting date, but no ending date.
For many of the project-based reports, you have the option of selecting "my projects" or "all projects." A project is included in the "my projects" list only if the user is a member of the project team. This gives you a convenient way of printing the same report but including only the projects that are relevant to a specific user without saving two copies of the report.
In other words, manager A's "my projects" list would be different than manager B's. So, they can both get only the data they need from BigTime's standard reports by selecting only their "my projects" list.
Note that you must have the system permission "show all projects" (permission 2.8) in order for the system to return projects in the reporting engine that you are not staffed on. Take a look at the Security Settings section for more information on granting specific security rights. If you don't have this right, then "my projects" and "all projects" will produce exactly the same list.
It's also important to note that the reporting engine is governed by the same security settings that govern the rest of the system. While you may be able to "request" a report showing all of the time entries for a specific project, for example, the report will return an "empty data" warning unless you have rights to see information on the project you've selected.
For staff-based reports, users often have a "my staff" vs. "all staff" option. A staff member is included in the "my staff" listing only if you have management authority over that user. Remember, each user is placed into one specific management group, and then managers can have authority over as many management groups as required.
As long as a manager has authority over a specific user's group, they'll be able to print reports on that specific user. This gives you a convenient way of printing the same report but including only the staff members that are relevant to a specific manager without saving two copies of the report.
In other words, manager A's "my staff" list would be different than manager B's. So, they can both get only the data they need from BigTime's standard reports by selecting only their "my staff" list.
Note that you must have the system permission "show all staff" (permission 2.7) in order for the reporting engine to return data on staff members that you don't have management rights over. Take a look at the Security Settings section for more information on granting specific security rights. If you don't have this right, then "my staff" and "all staff" will produce exactly the same list.
While you may be able to "request" a report showing all of the time entries for a specific staff member, the report will return an "empty data" warning unless you have rights to see information on the staff member you've selected.
This security feature is actually more robust in the reporting engine than it is on the staff list interface, so make sure that you have management rights over a specific user before attempting to print reports which include their data. Also - remember that this is only true of staff-based reports. Project based reports will show time/expenses for ANY staff member that's logged time/expenses to the project in question (even if the manager doesn't have staff management authority over that user).
In addition to the adjustable settings that show up in the toolbar for each of the Tabular reports, most of these reports have one or more "column sorting" options. you can click on any of the column headings on a tabular report in order to sort your report by the data in that column.
Some report formats in the system support "dynamic grouping." If your report has a dynamic grouping column, then clicking on a column that supports grouping will GROUP the rows in your report by your selected column.
Note that the "saved" sorting and grouping options always take precedence, so your selection might simply sort data within the groups that have already been created for the report. If you 'd like to make more advanced adjustments to the sorting options in a tabular report, then take a look a the section on BigTime's Reporting Wizard for more information.