Grid Formats
Grid formats are similar to the weekly formats outlined above, but they eliminate the separate edit pane. All of the fields in the grid format are editable directly, and there is only one "save" button for the entire page. Grid formats are our most popular formats, and they can be quickly custom configured to include custom fields, custom time periods, firm-specific summary information and more. The system ships with several grid format right out of the box, and you can talk with your sales rep about getting a customized grid format that fits your firm's specific needs.
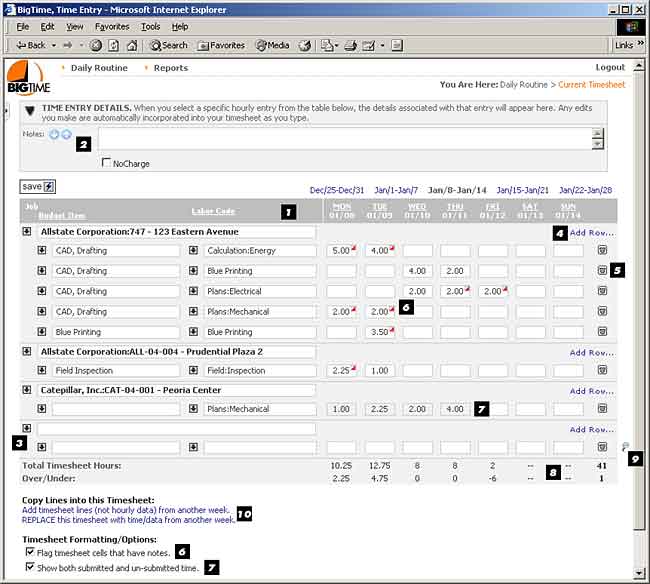
- Each field on screen is editable, so the grid at the bottom of the page works more like a spreadsheet than the standard weekly view.
- Notes, No Charge and other cell-specific data can be edited by clicking on a specific hourly cell. Any changes you make to those values are saved automatically as soon as you hit the save button on this page. So, you can quickly edit notes on several different cells without clicking save after each edit.
- To add new rows to your timesheet, fill in the blank row at the bottom of the page. As soon as you select a project, a new blank row will appear, so you can add as many rows as you need to at the bottom of the timesheet.
- Adding a row for a specific project is simple. too. You can use this feature to enter time against several different labor codes or budget items on the same project. Just click the Add Row link in the project's heading row.
- Delete rows using the trash can icon, and the system will automatically delete all of the time entry data associated with that row.
- Hourly data that has a note attached can be flagged with a red/white icon if you check off the "flag cells with notes" link at the bottom of the page. This lets your users see what entries are still missing notes before they try to submit their time.
- Submitted time can be displayed as well as un-submitted time, so users can see their historical timesheets in the format they're used to (instead of relying on the "All Timesheets" page). Note that users won't be able to edit submitted time entries, and hourly data that is submitted will show with a "grayed out" background.
- Totals are shown at the bottom of the page, just like the standard weekly formats, but the grid format also shows an overall total for the week, and it automatically removes the "over/under" value for weekend days.
- You can memorize rows in your spreadsheet (so that they'll show up as "blank" rows in every weekly period) automatically. Just enter in the left-hand side of the grid and leave the hourly data blank. When you click the SAVE button, the row will be added as a "memorized" row and will be available in every weekly timesheet, automatically.
- You can also copy rows from prior timesheets by clicking one of the copy links at the bottom of the page. You can automatically create a set of memorized rows from a prior timesheet by clicking the "add timesheet lines" link, or you can copy all of your timesheet data (including hours and notes) from a prior period if that's more appropriate.