Weekly Formats
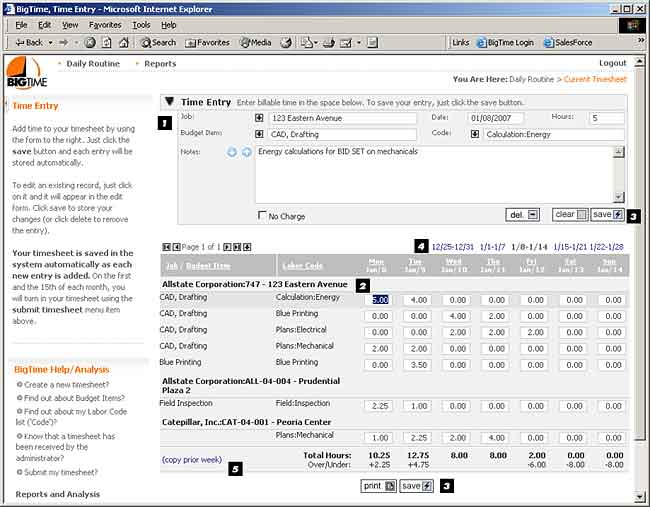
Weekly Timesheet formats typically show a data entry pane at the top of the page (used to add/edit entries) and a week-at-a-glance summary of existing time at the bottom of the page. Most of the weekly formats will look similar to the one shown below, and typically differ only in (a) the fields that are shown in the edit pane and (b) the columns that appear in the week-at-a-glance.

- The Edit Pane allows you to add new or edit existing time entry records. To edit a time entry record, you can just click on its cell in the summary pane and all of its detail will pop up in the edit pane.
- The Summary Pane can be used to edit hourly values. Just click on a cell and edit the hourly value directly. Note that you can use your arrow keys on the keyboard to move up and down through the rows in this week-at-a-glance view. You can also see a total number of hours per day at the bottom of the pane.
- Save Buttons appear on both the summary and edit panes. If you're making an edit to a detailed time entry, then click the save button in the detail pane. If you're just editing hourly data in the week-at-a-glance view, then click save at the bottom of the summary pane.
- Browse from week to week using the weekly links at the top of the summary pane. Each time you switch weeks, a new set of five weeks will appear, so you can continue to move backward and forward through the weeks as far as you'd like. Keep in mind that the weekly view doesn't show you submitted time (only the grid view can be configured to show both submitted and un-submitted time). To take a look at your submitted time, goto the Daily Routine...All Timesheets screen instead.
- Copy time from a prior week by clicking on the copy prior week link at the bottom of the summary pane. This is a quick and easy way to pre-fill your weekly timesheet with entries (submitted or un-submitted) from another week. You can click that link on Monday in order to pre-fill the week so that you don't have to type in projects/items/categories/etc.
