Consolidated Invoicing, Step-by-Step
To setup a client to use consolidated invoicing, just follow these steps.
- Open up the project dashboard for any of the invoices you'd like to consolidate. It doesn't matter which one, as long as you pick a project that is linked to client we'll be consolidating.
- Goto the Client... General page, and you'll see a "consolidated invoicing" selection that looks similar to the one shown here.

- Choose the project into which invoice data should be posted. This is typically the "master project" in QuickBooks, but you can choose any project attached to this customer.
Once you've setup this customer to use consolidate invoicing, any new invoices you create will be consolidated automatically. You don't need to do anything more!
- Invoices are consolidated by Client and Invoice Date. Any invoice (for this client) will be consolidated with any other project invoice created on the same date. This behavior is controlled by the Invoice Data (not the "print date" or the "due date").
- A/R Data is Consolidated as well. Your A/R data (pulled from QuickBooks) is consolidated at the customer level as well. Since payments are made against consolidated invoices, A/R will be tracked at that level as well.
Posting Consolidated Invoices to QuickBooks
Posting consolidated invoices to QuickBooks works just like posting a regular invoice, just check off the consolidated record and click the POST button.
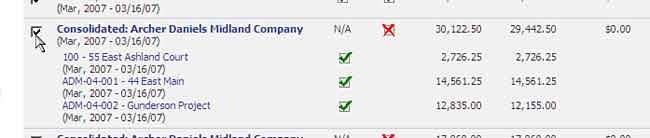
When you do, your consolidated invoice will appear in QuickBooks, just like the one shown here.
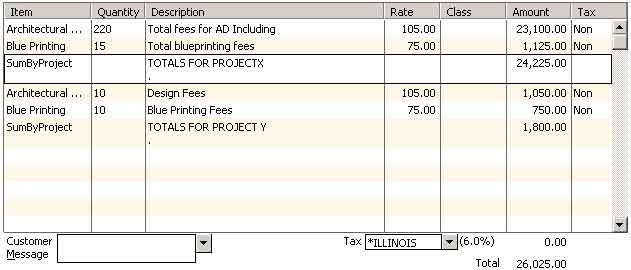
BigTime's consolidated invoice can post just the line items from each project, the line items along with a "sub-total" by project (the version shown above) or just the sub-totals by project. You can adjust those settings from the QuickBooks Settings (Invoice Integration) page.