For many legal and accounting practices, clients are required to pay "up front" for services that will be rendered over several weeks or months by the firm. Clients may pay an up front retainer to cover, for example, expenses or expected fees.
Depending on your industry, you may be required to account for those funds separately. Law firms, in particular, are required to keep a separate accounting, and are also required to prevent the co-mingling of those funds with the firm's own assets.
Unfortunately, QuickBooks doesn't provide a very powerful mechanism for keeping track of funds that have been placed "in trust" on behalf of clients. Typically, firms wind up with a complex set of journal entries or GL accounts in an effort to meet reporting requirements and still use QuickBooks to track the firm's financials.
BigTime can be used to fill in that void in the main QuickBooks program by turning on the Trust Invoicing features that are built in to the system. This section will review those features, and will show you how to setup your QuickBooks data to take advantage of them. Using the trust invoicing features built into BigTime, you can accomplish all of the following:
In order to take advantage of BigTime's trust invoicing features, you need to make sure that your QuickBooks file is setup properly. Keep in mind that the methodology outlined here isn't the only one for keeping track of trust accounts in QuickBooks. You could, for example, use specific income accounts, classes or even separate company files for each of your trust accounts.
This method has the advantage of being easy to track, easy to reconcile when bank statements come, and easy to report on in both QuickBooks and bolt-on applications like BigTime.
In fact, BigTime, expects that you are using the approach outlined below. When we pull expenses from QuickBooks, we expect to find the client's "trust account" information in specific places. We expect you to use specific reports to track those accounts. When we post invoices to QuickBooks (along with trust account payments for those invoices), we put them into specific GL accounts. So, you'll need to be using this approach to trust accounting in order to spot those payment transactions.
If you haven't already done so, begin by setting up a new bank account from your QuickBooks chart of accounts. From the Lists menu, choose the Chart of Accounts menu item. Choose the Account button and click New (or hit CTRL+N) to add a new account.
ACCOUNT TYPE: Bank
ACCOUNT NAME: Trust Accounts
OPENING BALANCE: $0
This "Trust Accounts" account is just setup so that you can keep your trust account data separate from the firm's other bank accounts. By setting up all of your trust accounts (as separate bank accounts) beneath this single "master account," it's easier to filter out trust account assets when you print out your firm's financial statements.
In addition to your initial "master" trust account, you should also have an "other current liabilities" account which is used to track deposits to these accounts. Typically, that account is created when you create your QuickBooks company file, but you should verify that it's there (and create it if it's not).
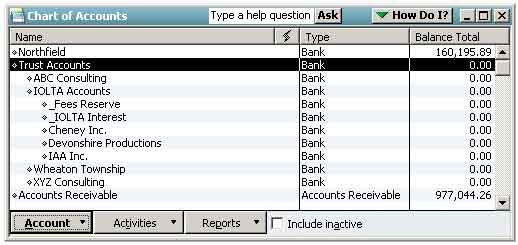
Each time a new trust is setup, you'll need to create a new bank account (beneath "Trust Accounts") in QuickBooks. If your state supports IOLTA Accounts, then you can setup a "master IOLTA Account" beneath the Trust Accounts record, but you will still setup separate trusts for each client.
Pooled trust accounts work the same way. You'll setup a single "master" account for your pooled account. That master will map to the physical trust account at the bank. Then, you'll setup separate accounts for each client beneath that master which will be used for accounting purposes.

Create new accounts the same way you created the original master account (from the QuickBooks Chart of Accounts). When you're finished, your Chart of Accounts window will look similar to the one shown above. Note that we have a few "segregated" trust accounts, and a number of "pooled" accounts. There's only one physical "pooled" trust account (called "IOLTA Accounts" here) at the bank, but the sub-accounts are used to fulfill your accounting requirements.
Keep in mind that your state will have rules about your firm's ethical responsibilities related to tracking separate trust accounts, and the number of sub-accounts you create is entirely up to you. A few things to consider as you setup your accounts in QuickBooks:
Note that (in our screen shot above), we've called those two accounts _IOLTA Interest and _Fees Reserve (the _ will force those two accounts to sort to the top for easy reference).
Once each trust account is setup, you're ready to create initial balances.
To create an initial balance, you can use the Make Deposits item (in the activities menu) for the trust account in question.
A couple of additional notes:
Once you've finished entering opening balances for your trust accounts, you can RECONCILE the overall account (based on your most recent bank statement). The beginning balance for your trust account will be zero dollars, but the ending balance should match your most recent bank statement.
Once your initial balances have been established, you can use the Make Deposits screen to record retainer/deposit payments. Note that there is a Check Number field which can be filled in as well as a memo. Use both of those fields and your financial reports will contain more detail.
Payments can be recorded in QuickBooks as checks and should be paid out of the client's trust account. You'll record any payments just like you do other expenses, but make sure that any payments that are made from the trust account are written from that account.
You should also make sure that each of your checks is entered against the "client trust liabilities" account. This will keep your firm's current liabilities number accurate.
Keep in mind that BigTime's trust fund accounting features will allow you to post both an invoice and a "payment from trust" transaction to QuickBooks automatically. Even though the entire thing is automated, it's helpful to understand how those payments are recorded in QuickBooks in case you need to go back and review or revise them.
When BigTime posts a "trust payment" in QuicBooks, it posts 3 transactions:
YOU STILL NEED TO TRANSFER FUNDS. Keep in mind that BigTime doesn't create a physical bank transfer, so a clients funds will sit in trust until you instruct the bank to transfer dollars from the trust account(s) into your firm's operating account.
The section below outlines how you would create each of those three transactions manually, and what they look like in QuickBooks. You don't have to read this section (since BigTime does all this work automatically), but it might be useful to understand how BigTime posts information to QuickBooks (in case you want to get in and adjust these transactions at some point).
Assume we have a customer called "CustomerX" who has paid us an $10,000 retainer. When we created the initial trust account for that customer, we recorded a $10,000 deposit and a $10,000 "Client Trust Funds" liability.
Invoice Document
Assume we have $8000 in fees to bill that customer. In QuickBooks, we'd create an invoice for $8000. At this point, here's how your accounts look for this client in QuickBooks:
Trust Payment Journal Entry
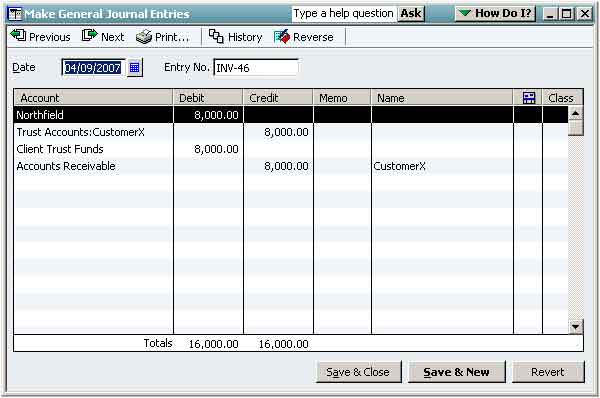
To Transfer $8000 from the client's trust fund to the firm's account (and, as a result, pay off the invoice), we need to use a QuickBooks journal entry. The screen shot below shows what that journal entry looks like.

We've moved $8000 from the client's trust account to the firm's main bank account. That's the top Debit/Credit transaction. Then, in the same journal entry, we've move $8000 from the "liability" account used to track client trust funds to the "accounts receivable" journal on behalf of CustomerX.
That one journal entry (entered in order to pay the invoice we created for the customer) will set our accounting records straight. All that remains is to physically transfer the $8000 from the trust account to the firm's checking account.
Invoice Payment Transaction
Once the journal entry has been created, we can use it to "credit" the invoice we've created in QuickBooks.
The invoice in QuickBooks will now show PAID in QuickBooks.