Invoicing by Date Range
To create an invoice for ONLY the time that falls within a specific date range, you'll need to browse to the Tools... Invoices, Create Drafts screen and follow this step-by-step:
- Change the "Start/End" dates in the information box on this screen. That will update the date range that appears on the left hand side of the project list, and the time on this screen will be divided up into time that falls within the range you specify and other time.
- Check off the project(s) for which you'd like to create a new draft invoice. If those projects have time that falls outside of the date range you specify, the system will ask you if you'd like to include that "other" time.

- Click CANCEL each time the system asks if you'd like to exclude time that falls outside of the period you specified. This will make sure your invoices include ONLY the time that falls within the date range you've specified.
- Click SUBMIT to create your invoices.
The system will create invoices for the projects you've selected, but it will "leave behind" any time that falls outside of the date range you selected. In addition, the system will automatically fill in the "Service Dates" field on your invoice screen.
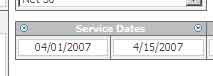
If you'd like your printed invoice document to include a service date range, then select any of the "simple" invoice formats, and make sure that the service dates are filled in on the invoice edit screen.