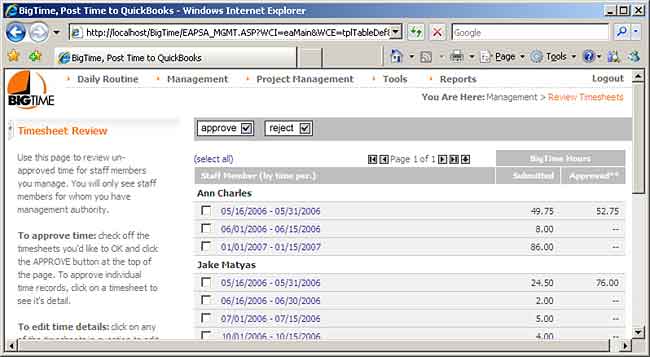
When a user submits their timesheet, the system will "stage" that timesheet in the manager approval area, and it will remain there until a manager approves or rejects it.
The timesheets you, as a manager, need to approve are all listed in the Management...Review Timesheets screen. When you select that menu item, you'll see a screen similar to the one shown below.

You can click on the date range in the list to pop up a detailed list of time entries for the period. There, you'll see user names, notes, dates, labor codes, etc. You can even click on specific entries to pop them up and make minor corrections yourself.
|
See Also |
If the entire timesheet looks OK, then you can just check off the box next to the date range and click the APPROVE button to approve all it.
If you'd like to send the whole thing back to the user for adjustment(s), then you can check off the box next to the timesheet date range and click REJECT. The system will ask you for a rejection "note" (so that it can tell the user why their time was rejected). Then, it will send all of those entries back to the user for revision.
Once the user revises that time, they can re-submit it, and it comes back to you for approval.
Keep in mind that you can also click into the timesheet detail and "spot-reject" or "spot-correct" individual time entries as well.
To review and accept/reject individual entries, you'll need to click down to the time detail page (by selecting a specific date range on the Management... Review Timesheet screen). Once you do, you'll see a list similar to the following.

Just click on any of the rows in that list to pop up the "edit time" screen for that entry. There, you will see an APPROVE button and a REJECT button.
![]()
If you reject a time entry, you should fill in the Revision Notes field (so the user knows why an entry was rejected). Once an entry is rejected, it will disappear from your list of time data to be approved, and it will be routed back to the user for revision.