Editing Expense Categories
You can edit any of the expense categories in the system by going to the Tools...System Settings...Expense Codes page. Just click on the code you'd like to edit from the list on this page, and you'll see an edit screen similar to the one shown here.
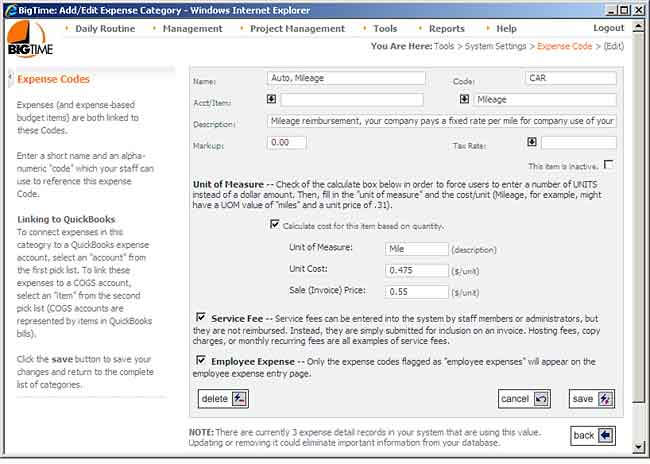
- You can edit the code's name, its ID (a quick-entry value that users can type in to select the code without going through the lookup list) and its description on this page. All three of those values appear in the pick list when a user attempts to select an expense category.
- Use the colon (":") character to create a 2-tiered list for the user, just like you can in the labor code list.
- You can setup codes as "taxable" by default (so that expenses logged against them are marked as taxable on any invoices you create).
- Inactive codes will remain in the system, but users will not be able to log new expenses against them. This lets you keep old codes (to maintain history), but limit what a user sees in the system going forward.
- Each expense code can be linked to either an expense GL account in QuickBooks or an item. This determines how any expenses posted from this category hit your GL account(s) in QuickBooks. Both fields appear on this form, but only one of them can contain a value. For help linking an expense to a COGS account (instead of an expense account), see the COGS Account section in this same chapter).
- Each expense category you create can be marked as a "per unit" expense. This type of expense won't ask users to enter a dollar amount. It will ask for a "unit" amount instead. Then, the system will calculate dollars from the user's entry automatically. Auto mileage (shown in the sample screen above) is the most common example of a per unit expense.
- Service Fee expenses are a specialized type of expense. Service fees are billed to the customer, but they aren't paid out to the employee. Things like mileage on a company car, copies and faxes are all examples of service fees that you may want your staff members to track but that they won't be reimbursed for. Take a look at the section on service fee entry for more information.
- Use the "Employee Expense" check box to show/hide an expense category on the expense "entry" page. Expense Categories will be used to classify employee reimbursable expenses, service fees, vendor expenses and credit card charges. Given that fact, you may decide that one or more of your expense codes should remain "active" but shouldn't show up in the employee's reimbursable expense category list.
Additional Information on Expense Codes
- Keep in mind that it's better to de-activate a category than to delete it if there is history attached to it. You'll see that the system flags categories with one or more expense entries attached to it at the bottom of this screen (next to the back button).
- Your expense category list can be sorted from the main screen (there's a "sort" link just above the category list on that page).
COGS Accounts and Billable Expenses
If you are attempting to connect an expense category to a COGS account (instead of an expense account), you must first create an item that is linked to that COGS account in QuickBooks. Then, you'll connect the expense category to that item (instead of to the account directly). You're forced to take this approach because QuickBooks doesn't allow you to record a "billable" expense to a COGS account directly.
Add a new item to your QuickBooks item list.
- In QuickBooks, select the Lists...Item List menu item.
- Right click on the screen that pops up and choose New.
- You'll need to choose an item type (typically Other or Non-Inventory) and fill in an item name on the Add New Item form.
- Check off the "reimbursable" or "used in assemblies" check box so that you can enter both a cost and a revenue account for the item.
- The expense account you select should be your COGS account, and the revenue account should be one of your income accounts (probably reimbursable expenses or an equivalent)
- Click SAVE once you're finished.
Import the Item List Changes into BigTime.
- From BigTime, goto the Tools...QuickBooks Data...Manual Imports screen.
- Check off the "Update ALL Accounts/Items/Lookups" check box and click the GO button. The system will tell you when the import is complete.
- Return to the Expense Category list and add/edit an item. You'll see the QuickBooks item you added when you attempt to link the expense category to a specific QuickBooks item.
QuickBooks Links and Vendor Expenses
For most versions of QuickBooks, BigTime automatically flags vendor expenses that you enter into QuickBooks and link to a specific job. Every night, any new expenses (or changes) are imported into the list of expenses that have been logged against that job. They're flagged as QuickBooks expenses, and they are linked to specific expense categories and/or budget items based on the links you've create in the expense category list.
For a complete review of how BigTime deals with these vendor expenses, take a look at the Expenses chapter in the System Guide or in online help.
Expense Markup Settings
Each expense code in the system can be given a default "markup," and BigTime will use that markup when invoices are created.
Each expense in BigTime has both a "payable" amount" and a "billable amount." Even expenses imported from QuickBooks support both payable and billable amounts.
The BigTime markup feature works by applying your expense category's markup rate to the expense's payable amount. That means you'll want to make sure that expenses imported from QuickBooks are attached to the proper expense category in order for the markup to be applied correctly. If your expense is a "per unit" expense (like mileage), then you can specify one price for the cost (e.g. - a reimbursable rate for mileage) and another rate at which customers will be charged. In that situation, the expense "markup" is built into the difference between the unit cost and the unit price (markups are ignored for per-unit expenses).
Keep in mind that BigTime supports a number of standard adjustments, and our professional services team can help you create markup logic that is more robust that this out-of-the-box functionality. Talk to your sales rep if you have additional questions.