BigTime's EMail Notices
The bottom half of the EMail Settings page contains a list of all of the emails that the BigTime system supports. Each email has a name (and an ID number for easy reference) and a target. EMails that have been activated for your organization have a green check box in the "enabled" column. You can edit the settings for any of these email messages by clicking on the email name.

- Name/ID is used to identify the email. It doesn't appear in the email itself (e.g. - it doesn't appear in the subject line or in the email body), but we use it in the documentation to refer to specific email messages. It's also a brief description of what information the email supplies, so it's a quick way to zero in on the message(s) you want to edit or publish. Note that many of the emails have similar names, so we typically refer to the email ID in documentation and on screen.
- Target tells you who will get the email. EMails can be sent (by default) to everyone in your organization, to just team leads (e.g. - people who are marked as a team lead in a particular project's team list), staff managers (e.g. - folks with management authority over specific staff groups) or the default system administrator for BigTime. Often, the "target" tells you what type of information the email contains (e.g. - emails targeted at "team leads" are typically driven by project information).
- The trigger field tells the email type (e.g. - scheduled, event-based or status emails). If the email is a scheduled email, then the system tells you what the current (or default) schedule is set to (e.g. - daily, weekly, etc.).
- Finally, the Enabled field shows you which of these emails you have currently enabled. BigTime won't send out notices unless you tell it to (even if the SMTP settings are configured), so you can pick and choose the emails that your firm wants to use.
You can edit or activate any of the emails you see on this page, just click on the email name and you'll see the email edit screen.
Activating a System EMail
Activating an existing email is simple. Just click on the email name in the list at the bottom of the System Settings...EMail Settings page to get to the edit screen. Then, choose from the scheduling options at the top of the edit screen. When you're done, just click the save button.
The email will be activated automatically based on the settings you've entered in the edit page. You can go back and make as many edits as you need to from the same EMail Settings page.
If you'd like to turn off an active email message, just click on it and hit the DELETE key. Once you do, the active version you've saved will be removed and the email will be "turned off" until you activate it again.
Editing a Specific EMail Message
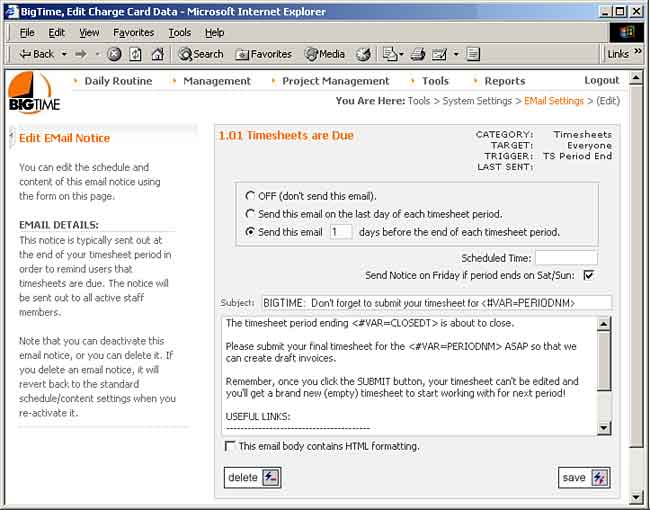
You can edit any of the email messages the system supports by clicking on that email's name/id from within the Tools...System Settings...EMail Settings page. When you do, you'll see a screen similar to the one shown here.

- Every email comes with a default subject and "message body," but both of those values can be edited using the controls at the bottom of the page. Note that many email use "merge fields" as a part of the message body (you can see that those merge fields follow the format <#VAR=FIELDNM>), so be careful when you make edits as every emails list of merge fields is different. If you ever need to revert to the original message subject/body, it's easy to do. Just DELETE the email and then re-activate it. Your changes will be removed and the newly activated email message will be pre-filled with the system defaults.
- The TRIGGER is what determines when/how-often an email is sent out. Your scheduling options will be different depending on the type of email . Scheduled emails will allow you to specify a daily, weekly or monthly schedule. End-of-period emails (like the one shown above) let you determine the number of days before the end of the period an email should be sent. Event emails can simply be turned on/off.
- Additional Parameters. No matter what type of email trigger you are editing, you may also be able to specify a number of additional parameters which the system uses when emails are sent out. Those parameters vary per email, and they appear right beneath the schedule box. The email shown above, for example, can be scheduled to run at a specific time of day, and it can be moved to the "Friday before" in the date you select turns out to be a Saturday/Sunday.
If you're working with an email that allows you to specify a specific time of day, then enter the hour you'd like the email to be sent out in HH:NN AM/PM format (e.g. - "6:30 AM", "4:30 PM", etc.).

